
How Can We Help?
SplashMaker+ : Platform Integration
Availability: Premium Packages Only
In addition to the core SplashMaker plugin and our SmartDoc/SmartApp themes, our premium SplashMaker+ packages also include our Platform Integration suite for Splashmetrics and other leading MA/CRM platforms. These powerful, time-saving integrations guide and automate much of the setup for your SmartContent assets, as well as their connections to your Buyer Journeys and the MarTech stack you use to run them.
Select your integration package below for more information…
The +Splashmetrics integration consists of the following components…
SplashLogic Sync
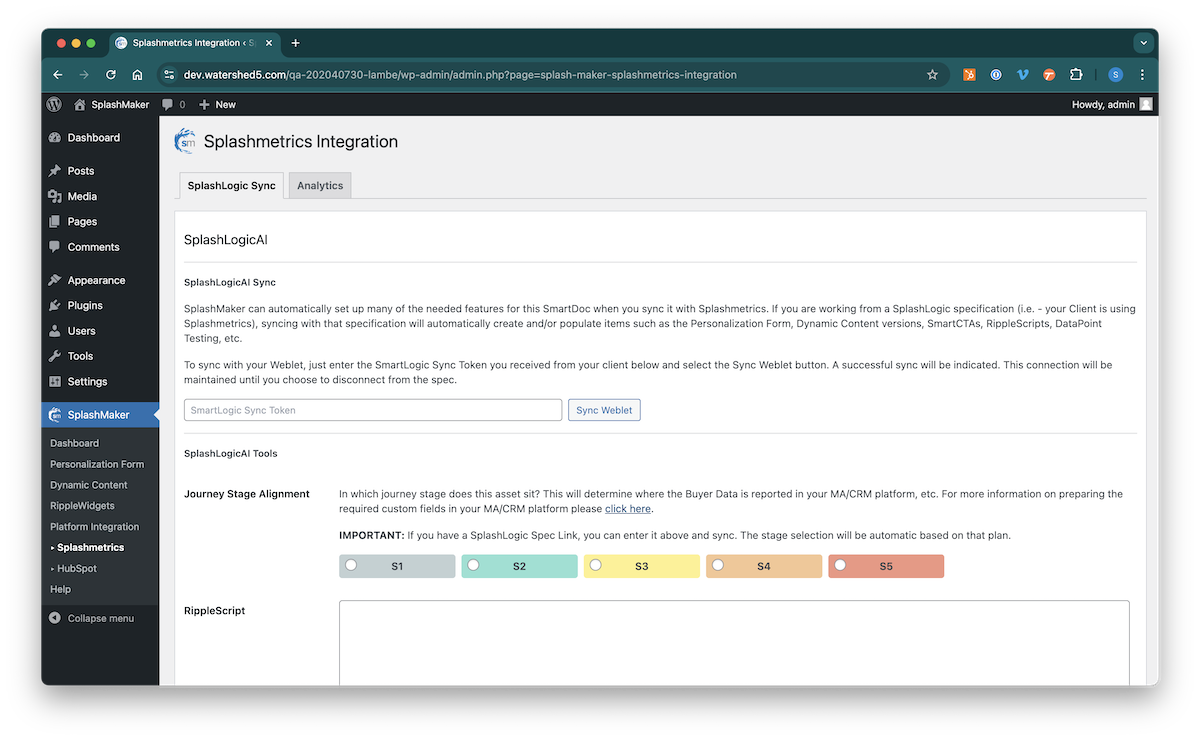
Via our proprietary SplashLogicAI, SplashMaker can automatically set up many of the needed features for your SmartContent asset when you sync it with Splashmetrics.
If you are working from a SplashLogic specification, syncing with that specification will automatically create and/or populate items such as the Personalization Form, Dynamic Content versions, SmartCTAs, RippleScripts, CRM data flows, etc.
To sync with your SplashLogic spec, just enter the SplashLogic Sync Token from the spec and select the “Sync Weblet” button. A successful sync will be indicated. This connection will be maintained until you choose to disconnect from the spec.

When connected, you will see the following SplashLogicAI Tools…
Journey Stage Alignment: Here you’ll see where this weblet sits in the Buyer Journey Flow stages from the Splash plan – which is helpful in understanding the level of qualification and knowledge the Buyer will have at this stage. This setting also ensures that the Buyer data flowing into the CRM is automatically directed to the correct fields.
Progression CTAs: Here you’ll see the information for the weblet in the next Flow stage…
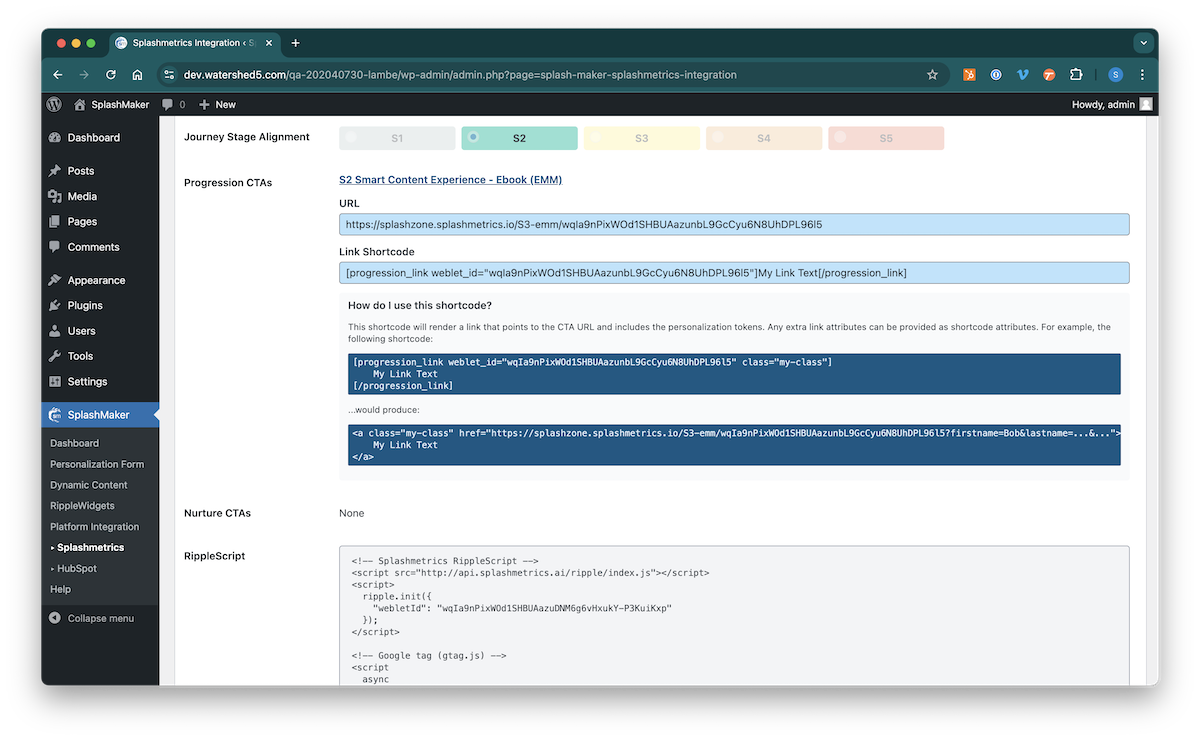
First, you see the name of the next asset so you can reference it in this weblet if you’d like. Then you see the URL for that weblet – which you can use on a button, etc. to progress the Buyer to this next Flow stage asset.
And finally, you see the Link Shortcode. This gives you additional out-of-the box capability for this CTA. Instructions on how to use it are shown in the dark blue boxes.
If you are using our content version templates, this CSS class has already been set up for you on the buttons, etc. So, the personalized cross-linking will happen for you automatically.
If you are creating your own content and/or adding additional buttons, menus, etc. you simply need to apply the following SmartCTA CSS class to the items:
splash_smart_ctaThat’s it. You should now have automated personalized cross-linking between weblets!
Next, if there are any related Nurture assets in this stage of the journey, the URL(s) for those will be shown.
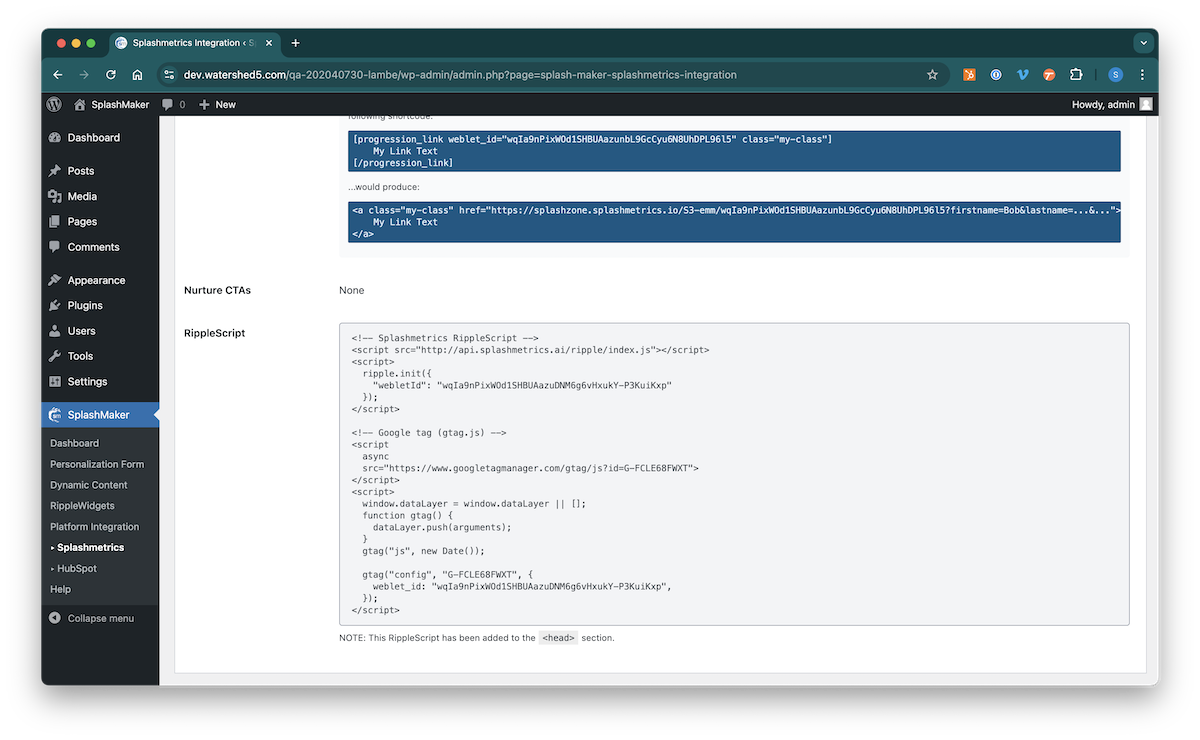
Finally, you’ll notice the RippleScript field. This script automatically ties this Weblet back into the Splashmetrics Analyze component for full 360° analytics.
These tools work together to automatically ensure you’re building this Weblet to the strategic Splash plan’s exact specifications.
Analytics

These are standard analytics datapoints that report back to the Splashmetrics Analyze component when assigned to a various actions within the asset. These can be click-based and/or script-based actions as need be.
Based on the SplashLogic spec, you need to determine where these are used in your SmartContent asset.
To use them just click in the blue field to copy the datapoint to your clipboard. Then apply it as follows:
Click-Based Datapoints: These datapoints are CSS-based and can be assigned to buttons, text, links, etc. as a class.
Script-Based Datapoints: These datapoints are typically variable- and script-based and can be assigned to interactions, inputs, scoring, etc. Any of the above datapoints can be reported this way instead of by click if required by using the shown syntax in your javascript.
To make things easier for you, we have already assigned these analytics datapoints to various components in the SmartDoc Dynamic Content pages (Version01 and 02) such as CTA buttons, interactive widgets, etc. So you only need to do the above if you are adding custom components, etc.

The +HubSpot integration consists of the following components…
HubSpot Account
This component allows for connection to a specific HubSpot account via OAuth.

If this is the first SplashMaker asset you are connecting to your HubSpot account, you’ll see the Package License Key you used to activate this SplashMaker+ package already populating the blue field.
!!Click in this field to automatically copy the key to your clipboard. You will need it in a moment!!
Important Note: If SplashMaker detects an existing SmartToken account for your entered License Key (i.e. – you’ve already been through this initial connection process), the key will be shown as asterisks and the Connect button will automatically activate. Just select that button to finalize the connection to HubSpot.
Next, select the Get SmartTokens button.
This will open a new tab and direct you to your HubSpot account(s). If you are not logged in to HubSpot, you will be required to do so. Simply select the account you want to connect to and approve the connection.
You will then be redirected to the SmartTokens page shown here…
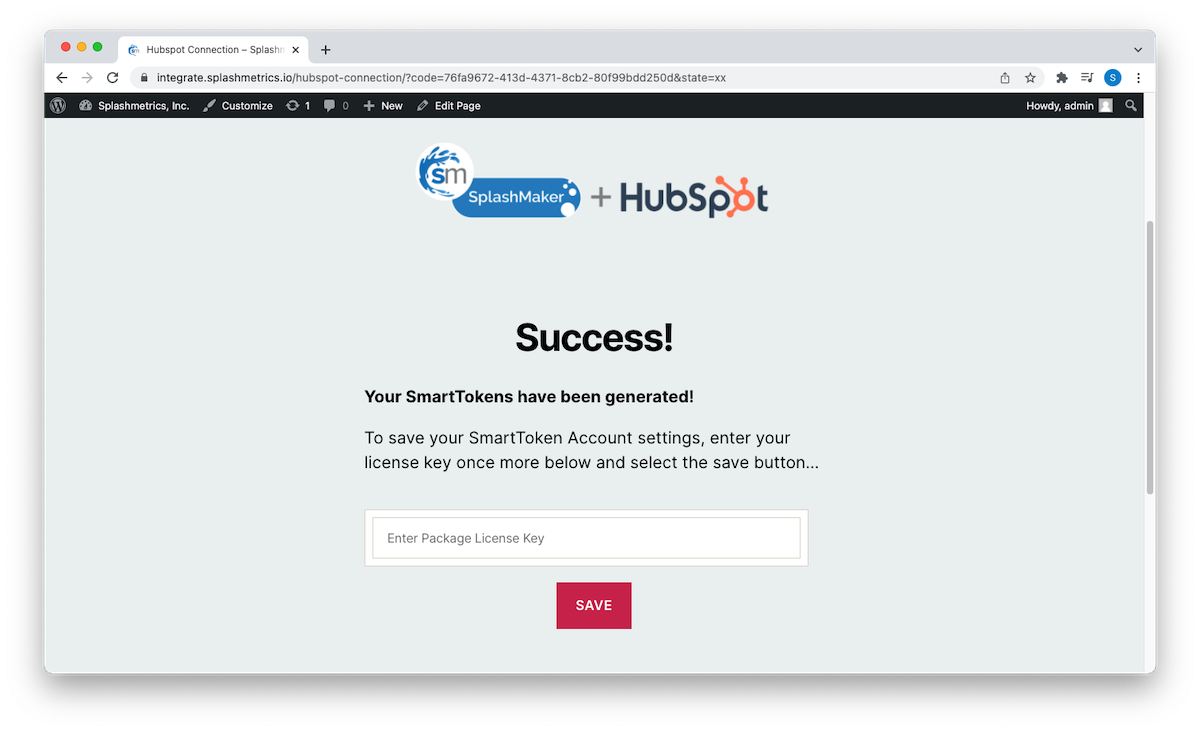
The SmartTokens for your connection are automatically generated in the background. So all you need to do at this point is paste your License Key into the provided field to save your SmartToken account.
Once that’s done, simply return to the SplashMaker asset in your other tab and refresh the page. SplashMaker will detect the new SmartToken account and activate the Connect button. Select that Connect button to finalize the connection to HubSpot.
When the connection is successful you’ll see the orange indicator with your HubSpot account number listed…

That’s it! You’re connected!
NOTE: If you see a “Couldn’t complete the connection.” error from HubSpot, that likely means your SmartToken account has not yet been set up. Please contact us via the chatbot us if that’s the case.
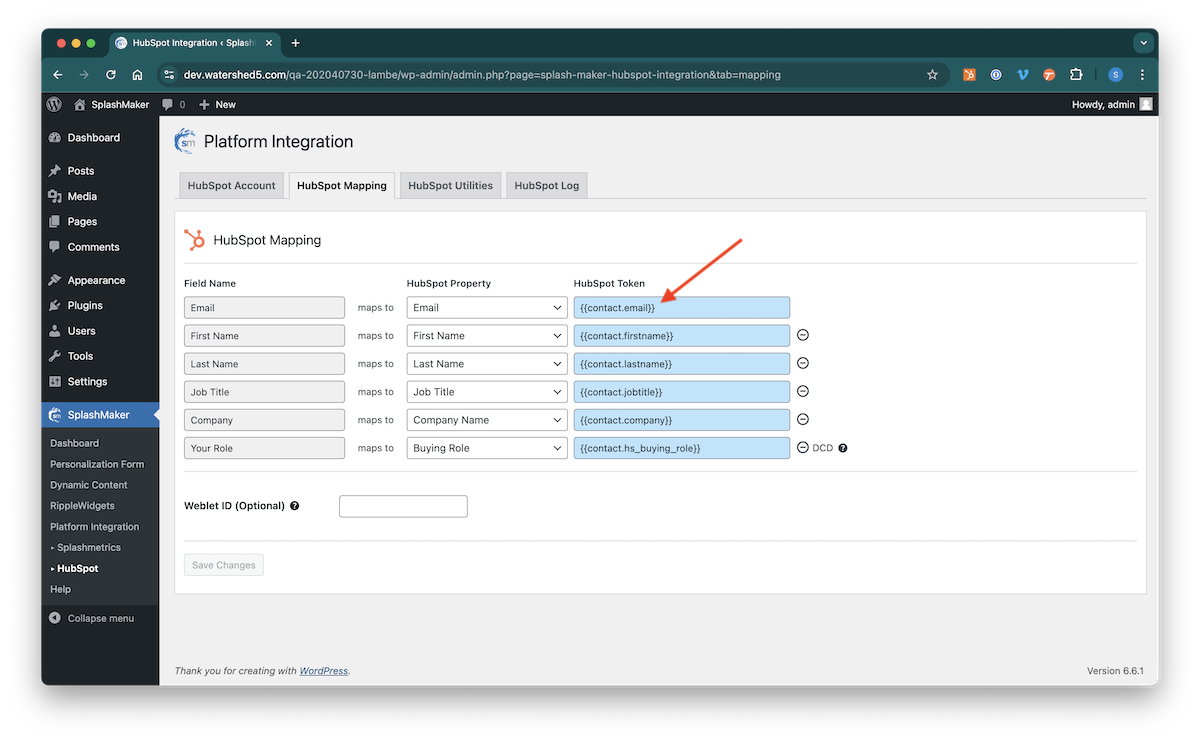
HubSpot Mapping

This section allows you to map various Personalization Form and ID items directly to HubSpot Contact Properties (standard and/or custom) so that these items can be passed immediately and seamlessly into HubSpot.
This section should already be populated with the items currently in the Personalization Form.
IMPORTANT! Before you work with this section, first make sure you have made all necessary changes to the Personalization Form component.
On your first time into this page after setting up the Personalization Form, you’ll see that the Save button is activated (as shown above). Select that button and SplashMaker will automatically create the appropriate mapping and tokens for these standard properties.
When this page is saved, and if you have already connected your HubSpot account like above, SplashMaker automatically maps all Standard Form items/fields for you and shows the related internal names/tokens from HubSpot.
Though we don’t recommend it, you can change any of this standard mapping as you see fit.
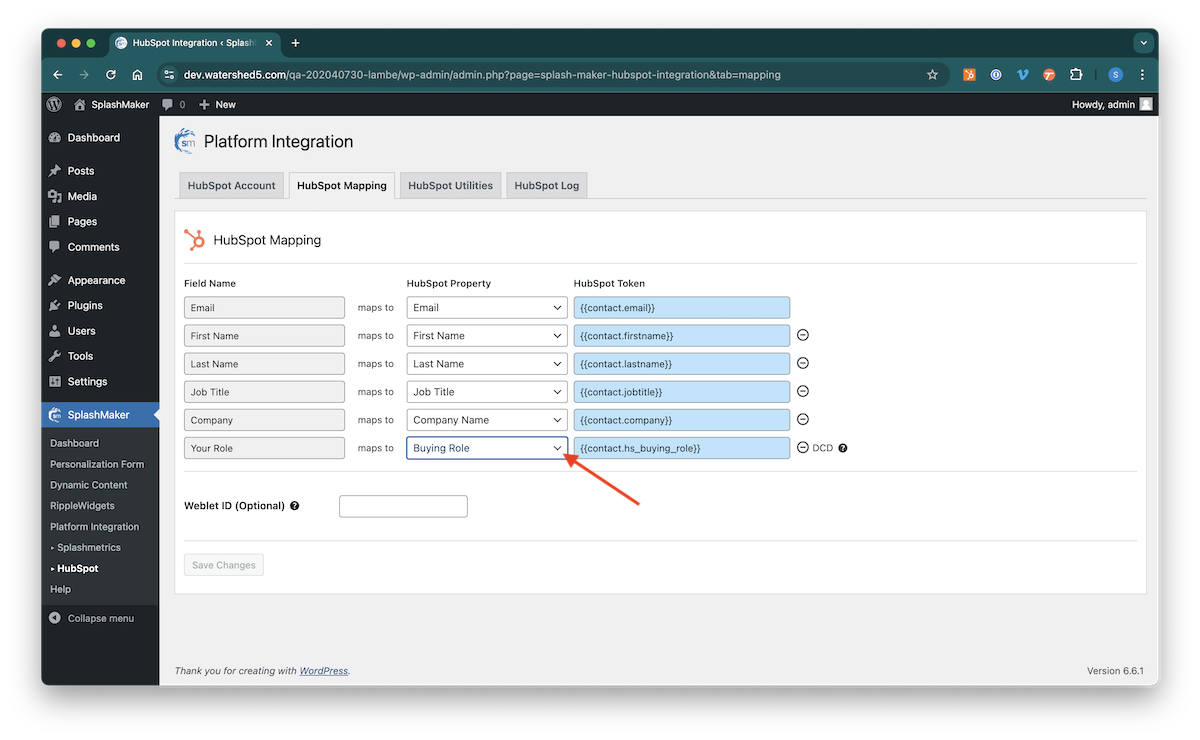
For items that are not Standard contact fields in HubSpot, you will need to use the pulldown to manually map them to either existing contact properties within your HubSpot account, or to custom properties you’ve created to track specific datapoints.
You can see in the image above that the “Your Role” DCD item is mapped to a custom contact property in our HubSpot account for that data.
Now, select the Save button to add this new mapping item.
We have pre-coded many of the Buyer Data passes into HubSpot for you. However, in order for them to work, you must create custom properties (simple text fields) in HubSpot. Click here for information on how to set up those properties.
For example, the RippleWidget SmartChart and SmartQuiz components can pass not only the selection(s) made from the dropdown, but also a “Buyer Action Alert” if the Buyer selection indicates they are a qualified sales lead. Therefore, you must create a custom property with that title – and the “buyer_action_alert” internal code for this to work correctly.
Also, remember that if you map an item to a standard HubSpot property that has its own specific list of options – you must pass one of those existing options for it to work correctly.
For more details on how all this works, see the PRO TIP section at the bottom of this page.
Finally, after you’ve saved your mapping, if you make any changes to the Personalization Form you will need to come back here to ensure the new items are mapped as well.
Changes made to the Personalization Form are automatically updated on this page…
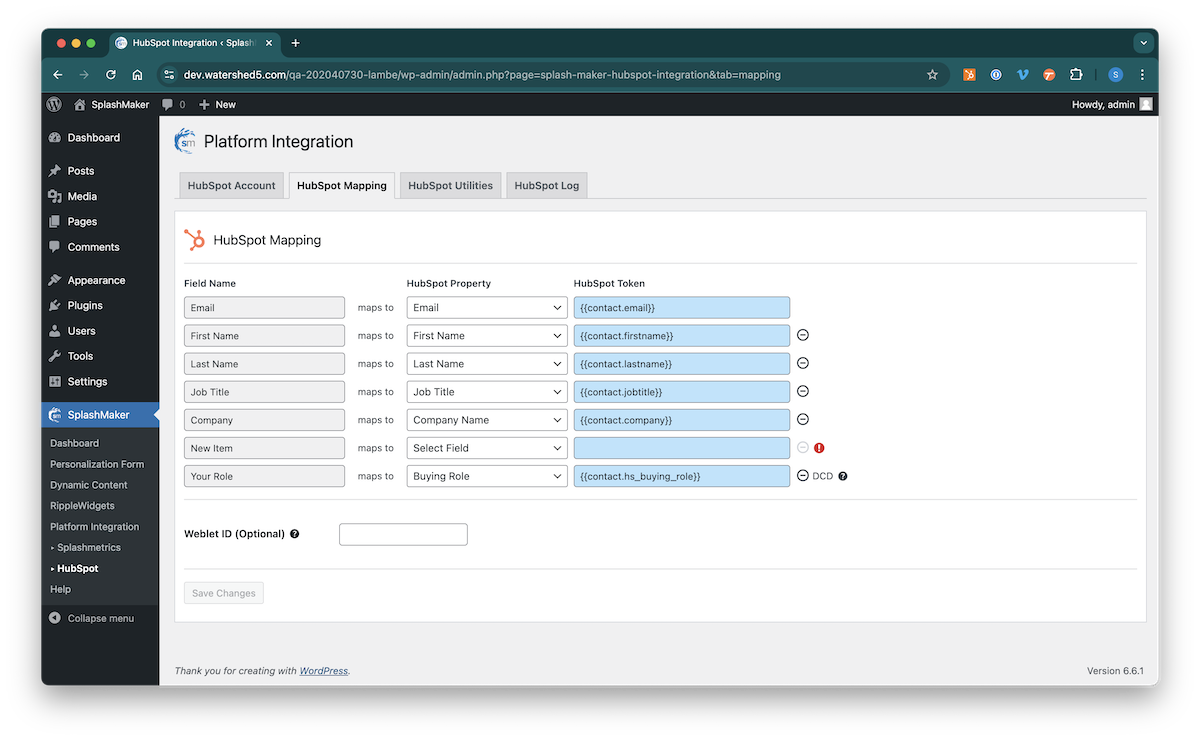
Just map the new DCD item and Save these settings. That’s it!
Important! Keeping the Personalization Form and HubSpot Mapping in sync is very important for the Smart CTAs component to work properly. If all the fields are not accounted for, the link won’t work correctly.
The last item on this page is the Weblet ID. This is an optional setting which is actually a very powerful and somewhat critical component if you intend to have multiple SplashMaker+ assets and/or full Buyer Journeys using SplashMaker+.
The tag you put here is automatically appended to both the SmartCTAs link and to the custom Buyer Data items you push into HubSpot from user interactions in the content, so you know exactly where the data is coming from
For example, maybe you are building Smart eBooks for multiple divisions or products for your enterprise. Adding this Asset Site ID will let you know in HubSpot which division’s/product’s eBook a particular Buyer is interacting with.
So, this setting allows you to scale your content marketing efforts up to an enterprise level with clear attribution for every single asset across every single Buyer Journey.
This approach provides significant time-savings in areas where the items are standard and known – but also provides full flexibility for those items that you need more custom control over.
HubSpot Utilities
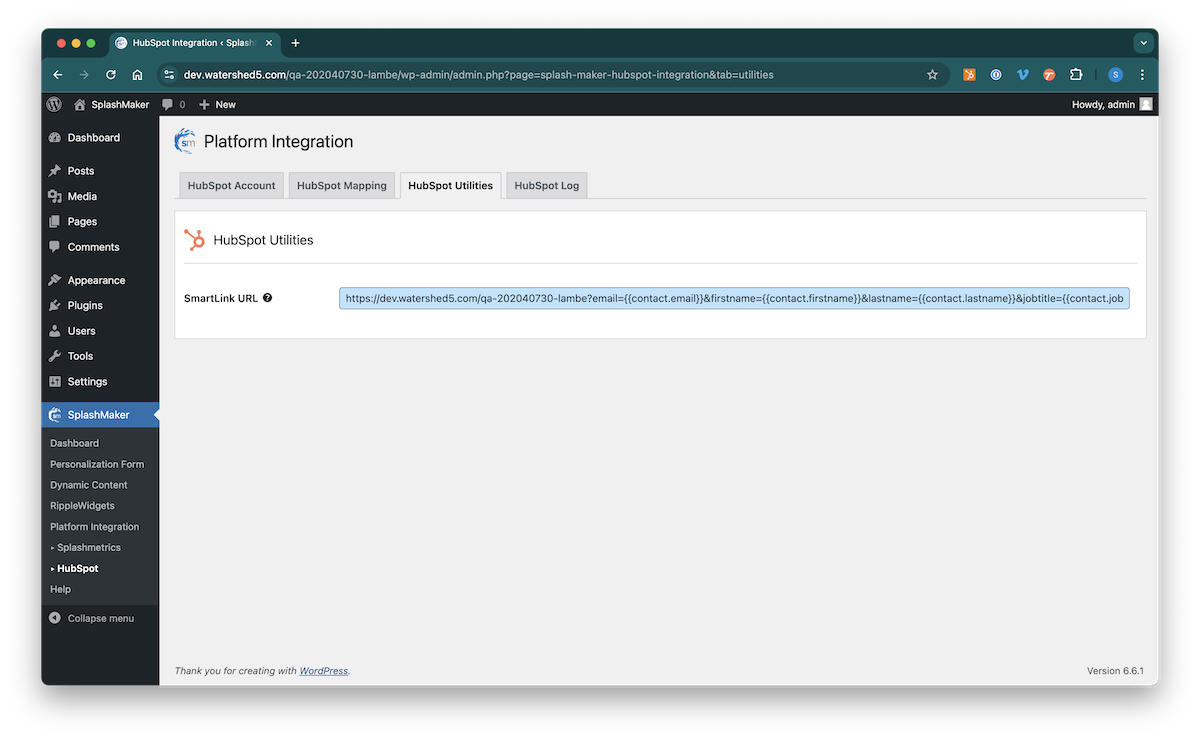
This SmartLink URL is automatically generated from the HubSpot Mapping component. So having that mapping right is critical for this SmartLink to function correctly. If you’ve saved your mapping changes, it should look like this. Note the HubSpot Tokens in the blue fields…
The HubSpot SmartLink Generator takes these HubSpot Tokens and automatically generates a SmartLink URL to this SplashMaker content experience asset.
This URL can then be used in Hubspot on a text link or a button in an email, landing page, etc. – and will auto-personalize that CTA for every known Buyer for whom you already have the form information. This allows known Buyers to come directly into this SplashMaker content experience with no form or cookies whatsoever. It’s perfect for ABM!
Let’s take a quick look at the SmartLink code…
https://asset.xyz.com/custom/?email={{contact.email}}&firstname={{contact.firstname}}&lastname={{contact.lastname}}&jobtitle={{contact.jobtitle}}&company={{contact.company}}&dcd={{contact.hs_buying_role}}&assetid=productXThe items on the left side of the “=” sign are from the Personalization Form. (except for the AssetID which is from the HubSpot settings page). And the items on the right side of the “=” sign are the HubSpot personalization tokens.
SPLASHMAKER NOTE: If you have added hidden fields into your Personalization Form, these will NOT automatically show up in this link. You must manually add those items to this link for it to work correctly. For example, if you have a hidden field called “Attribution” to track these assets, and the field value is set to “xyz” – you would need to add “&attribution=xyz” after the AssetID item for this to work.
If you don’t do this, the asset will auto-default back to the form page when you link to it from HubSpot.
HUBSPOT NOTE: If you are using these SmartLinks in native Sequence emails in HubSpot, please be aware that at the time of writing this, HubSpot does NOT automatically add UTM parameters to these SmartLinks. HubSpot does add them with Marketing emails (if you have that set in the UTM settings in HS). Just not with Sequence emails. In turn, this means that Splashmetrics will see this Sequence traffic as Direct – not Email as it should. To fix this, you need to manually the &utm_medium=email parameter to the end of the above link.
The point is, you can always tweak these SmartCTAs as needed to ensure things work exactly the way you want them to for each and every Buyer.
HubSpot Log
This section simply records the data submitted into HubSpot from the asset via the OAuth connection.
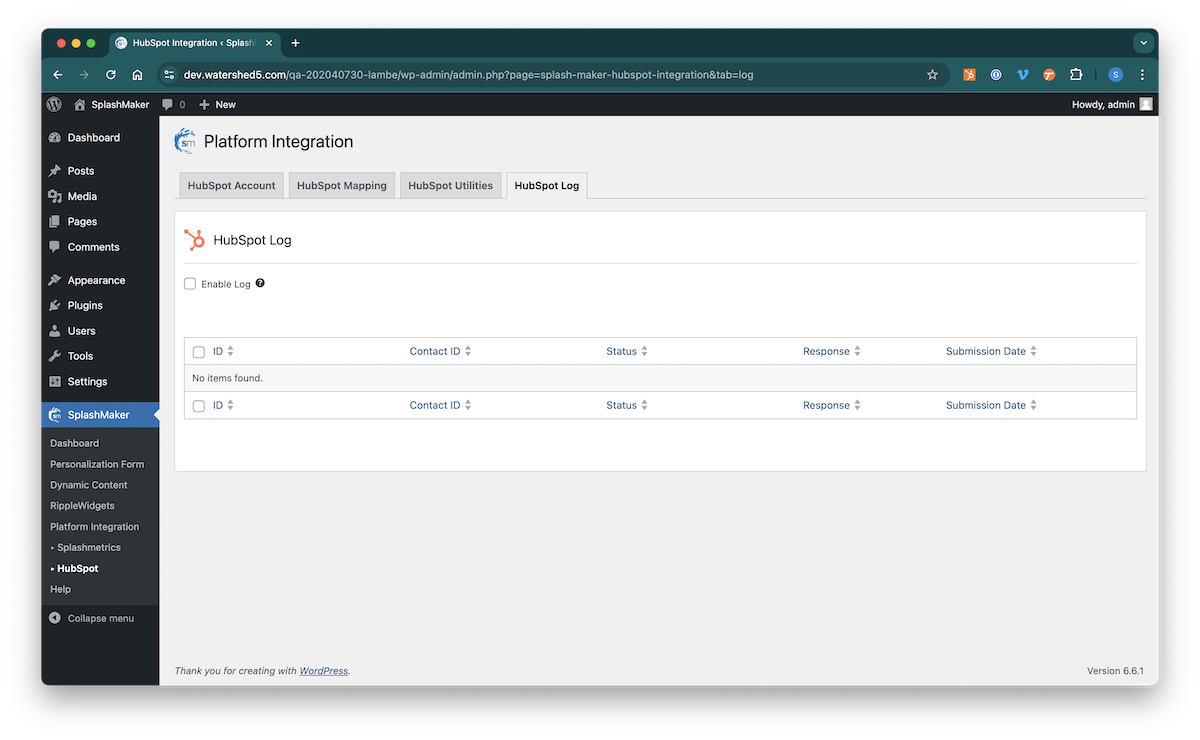
Here you can see the ID, Status, Response, and Submission Date of each submission. No sensitive information is maintained here. It is just a means of ensuring the flow of data is proceeding as expected.
PRO TIP: There is a lot of power in SplashMaker+ as it relates to how you use it with MA/CRM platforms like HubSpot. For example, the SmartCTA, which is driven by this mapping, allows you to send known Buyers directly to the custom version of your content without the need for the form or cookies. But this requires some thinking a proper setup.
For example scenarios on how to set things up properly in HubSpot, visit the help page here.